Outdoor Steps: How to Design a Flight of Garden Steps
Nov 03, 2026
By Duncan Heather, Director of the Oxford College of Garden Design
Outdoor steps are one of the most underrated opportunities in a garden design. On any site with a real change in level, how you handle that change shapes the whole experience of moving through the space - and get the dimensions wrong, and you've also created a genuine safety hazard.
The size and shape of outdoor steps on new buildings is governed by the local Building Regulations. That control is aimed mainly at disabled access to a main entrance, but the legal obligation to design safely applies far more widely than that.
Why Consistency Matters
The rise and going (tread) dimensions of a formal flight of stairs should be constant throughout. This isn't a minor detail - an unexpected 15mm difference in a single riser is enough to make someone stumble.
People rightly expect formal steps to let them walk up and down at a steady rhythm, so adjacent flights need identical dimensions too. Treads should be level, though a small drainage fall from back to nosing - around 1:60 maximum - is worth building in. The same applies to the ground at the top and bottom of the flight, and to any intermediate landings.
Natural stone steps built as part of a rockery can justifiably be rugged, uneven and steep - that's part of their character. What you shouldn't do is mix formal and natural steps in a way that catches the user unawares, moving from one logic to the other without warning.
The Comfort Formula
The physical effort of climbing steps is commonly expressed as:
twice the rise, plus the going
The assumption behind it is that stepping up takes roughly twice the effort of stepping forward the same distance. So if you reduce the rise by 20mm and increase the tread by 40mm, the flight still takes the same overall effort to climb. For external steps, the usual target range for this formula is 2R + G = between 550mm and 700mm.
Choosing Your Dimensions
Outdoor steps should generally be shallower than internal stairs. There's usually no handrail to steady yourself on outside, and people are often looking at the view rather than watching their feet.
As a rule of thumb, I'd suggest risers between 120mm and 160mm, and treads between 280mm minimum and 450mm, with a preference for 300mm or more. Once you've picked a pairing, check it against the 2R + G formula to confirm it falls between 550mm and 700mm.
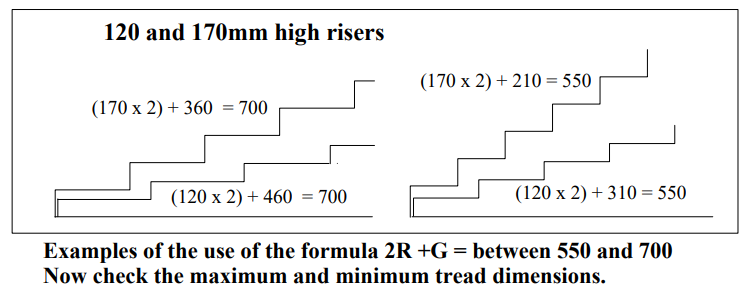
If you want users to take an additional pace between risers, add at least 700mm onto the tread dimension. And if you're combining steps with a ramp to create a stepped ramp - the Princess of Wales Conservatory at Kew is a good reference point - you'll need a dimension of 1–2m between risers, with the ramp itself at a maximum gradient of 1:15. It's not ideal, but a stepped ramp at that gradient can still be wheeled up or down with a pushchair, wheelbarrow or lawnmower.
Nosing and Trip Hazards
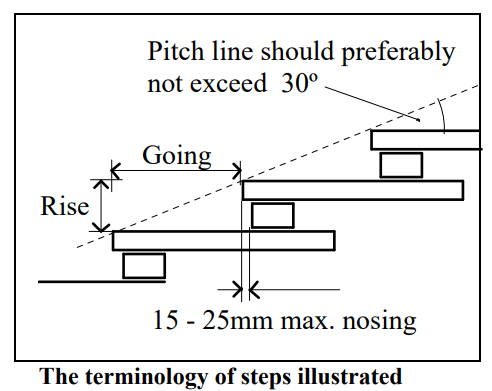
An overhanging nosing of 15–25mm is particularly useful on shorter treads of 300mm or less, since it helps stop people stubbing a toe against the riser. Go beyond 25mm, though, and the overhang itself becomes a tripping hazard. Building Regulations Part M recommends rounded nosings specifically to reduce that risk.
Single Steps and Flight Length
A single step is a hazard in its own right, precisely because a small change in level is easy not to notice. If a single step is unavoidable, make sure colour contrast or a change in texture gives people a clear visual warning.
Where you have the choice, use a flight of at least three steps, or use a ramp instead. And to limit how serious a fall could be, keep each flight to a maximum of around 12 steps (roughly 1.8m of vertical height), and never more than 16 steps without a landing to break the run.
Key Takeaway
Good outdoor steps are invisible in use - the person climbing them shouldn't have to think about them at all. That only happens when every riser and every tread in a flight is identical, checked against the comfort formula, and built to the regulations, not just to what looks right on the drawing.
If you'd like to learn more about garden and landscape design, take a look at our online Garden Design Diploma and start building a career as a landscape designer.